Kick Drum EQ: 13 Powerful Tips For A Clear, Punchy Sound
It’s not easy to EQ a kick drum. In fact, this can be one of the hardest parts of the mixing process.

It can feel impossible to get the kick and bass to fit together without competing. Many kick drums sound boomy or muddy, and it’s hard to clean them up. And the acoustics in most home studios make it challenging to figure out what the right kick drum EQ decisions even are.
If these challenges sound familiar, you’re not alone. But don’t worry — in this article, you’ll discover 13 powerful tips that will make EQing any kick drum much easier. Follow these simple tips and you’ll be able to approach the EQ process with more clarity and confidence right away.
But before we dive in, make sure you grab my free EQ Cheatsheet below. It’s packed with more tips and tricks that will help you use EQ to craft mixes that sound clearer and more professional today.
Tip #1: Start With The Right Ingredients
If you start with the right kick drum sound, it’ll be easy to nail your kick drum EQ. On the flip side, it’s nearly impossible to use EQ to make the wrong kick sound great.
Many people record a kick drum poorly or choose a bad sample, and then spend tons of time trying to fix the problem with EQ. Instead, get things right at the source.
If you’re recording a kick, pay close attention to mic placement. Experiment with a few different positions to determine what sounds best. Often times, taking the front head off the kick and putting a towel or other dampening material inside the drum can significantly improve the sound.

If you’re working with drum samples, take the time to listen to a few dozen before you settle on one. Don’t just go with the first sample you hear, or the one you chose in your last track.
If you start with the right ingredients, you’ll be amazed at how much better your kick drum will sound. And often times, you won’t have to EQ it at all.
Tip #2: Check For Phase Problems
If you’re using more than one mic or multiple drum samples, don’t forget to check for phase problems before you reach for EQ. Flipping the polarity on a track or nudging a waveform can fix all sorts of problems you might spend hours trying to solve with EQ.
To learn how to find and fix phase problems on your kick drum, watch the video below.
Tip #3: Add A Sample
If you’re having trouble EQing a live acoustic kick drum, find a drum sample to augment or replace it before reaching for more EQ. Adding a kick drum sample underneath the live kick (using a plugin like Slate’s Trigger) can help you achieve a more professional sound without over-EQing. In many songs, you can even replace the original kick completely without the performance sounding artificial or unnatural.

Tip #4 – Listen In Context
A mix is not a collection of isolated tracks. Every track in a mix works together and influences how the other tracks sound.
That means your kick drum EQ should vary depending on what the other tracks in your mix sound like.
If you have a bass in your mix that has a lot of low end, you probably want a thinner, brighter kick drum so the two tracks don’t compete. On the other hand, if your bass sounds thin and bright, you can usually afford to add more sub on the kick.
While EQing the kick, avoid the solo button and listen to all the tracks in your mix together. Otherwise, you won’t know how the kick fits in with everything else. You could EQ the kick in solo, but when you put it back in context with the mix, you may realize you made the wrong decisions. Listening to everything together will dramatically improve your kick drum EQ decisions.

Tip #5 – Get Everything Else Out Of The Way
Often times, when we feel our kick isn’t cutting through the mix, we immediately go over to the kick drum track, add an EQ, and try to fix the problem there.
Sometimes this can help. But often times, when a kick sounds muddy, the problem isn’t the kick — it’s other tracks that are getting in the way.
You can use a process called the “Mute Button Method” to determine which tracks in your mix are competing with your kick. Here’s how it works…
How To Apply The Mute Button Method
While listening to all the tracks in your mix together, go through your session and mute one track at a time. Once you mute a track, listen to your kick drum and see if it sounds clearer. If not, unmute the track and move on to the next track in your mix. Mute that one, and listen to the kick and see if it sounds better.
You’ll often find that you mute one track and suddenly the kick becomes crystal clear. Now you know that the track you muted is the one that’s getting in the way of the kick.
Go over to that track, add an EQ, and roll off some low end so you can hear the kick more clearly. This approach can easily create more clarity and impact on the kick in your mix.
To see the Mute Button Method in action, watch the video below:
Tip #6 – Listen On Headphones
If you’re mixing in a typical home studio, the acoustics in your room probably aren’t great. This doesn’t mean you can’t produce good mixes, but it does create some challenges.
The biggest acoustic problems in most home studios are in the low end. This makes it difficult to hear your kick drum clearly. And if you can’t hear what your kick drum really sounds like, it’s hard to choose the right kick drum EQ settings.
Often times, the best choice is to EQ your kick drum on headphones. Since headphones remove room acoustics from your monitoring chain, they will help you hear a more accurate representation of what’s going on with your kick. And if you can hear the kick more clearly, you’ll make better kick drum EQ decisions.
Tip #7 – Use The “Over, Under” Technique
One of the main challenges we face when EQing a kick is that the kick competes with the bass. Your kick might sound great on its own, but when you put it together with the bass, it suddenly sounds muddy and unclear.
This is because both the kick and the bass have lots of energy in the low end. When two tracks have a lot of energy in the same area of the frequency spectrum, something called “masking” occurs. This means that one track will get in the way of another. And the whole thing sounds like a mushy, muddy mess.
One of the best ways to solve this problem is to use the “over, under” technique.
How To Apply The Over, Under Technique
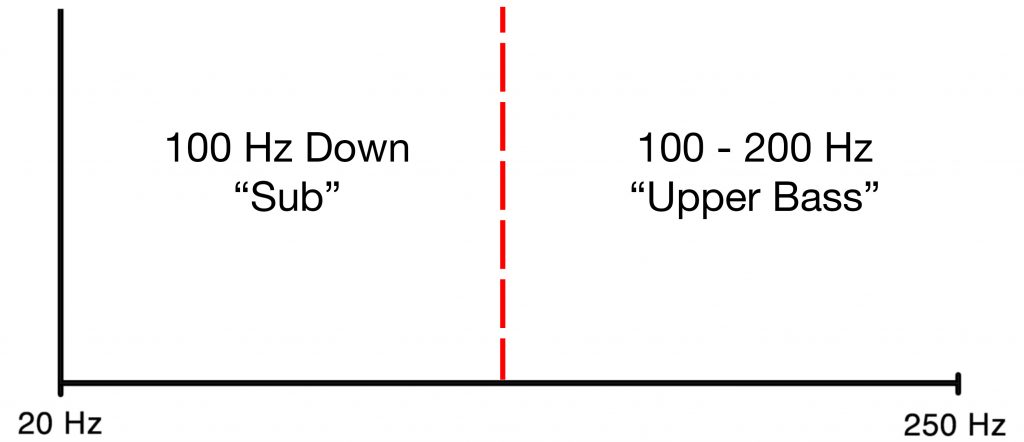
Imagine dividing the low end into two sections. One section is from 100 Hz down — we’ll call this the “sub”. The other section is from 100 Hz to around 250 Hz — we’ll call this the upper bass.
You can think of these sections as two separate areas of the low end. When the kick and bass are competing, you can use EQ to put the kick in one section, and the bass in the other.
To do this, listen to the kick and bass and ask yourself, which of these tracks is sitting over (above) the other?
Does the kick naturally feel like it has a deeper, more room-shaking tone than the bass? If so, the bass is probably sitting over the kick. Or does the bass feel like it has a deeper, subby tone? If so, it may be sitting under the kick.
Applying EQ With The Over, Under Technique
Once you’ve got a sense for which track is naturally sitting over the other, you can use EQ to finesse this relationship. For example, you might add a high-pass filter to the bass to scoot it up the frequency spectrum, so that it sits more firmly over the kick. Or, if the bass is sitting under the kick, you might add a high-pass filter to the kick and roll off some of the deepest lows so it sits more clearly over the bass.

Use the over/under technique, and you can add instant clarity to the kick in your mixes. This approach will also help eliminate competition between the kick and bass, so you can hear both clearly.
Tip #8: Consider Tempo
Most people don’t think about how the tempo of a song impacts their kick drum EQ decisions. But the truth is, tempo plays a significant role in determining how you should approach your kick drum EQ.
In short, the faster the tempo is, the less low end you usually want in your kick. Songs with faster tempos usually have thinner kick drum sounds. You can hear this clearly on most heavy metal music. If you listen to the kick drum in these songs, it often sounds super thin with a ton of top end, but almost no low end.

If you’re mixing an uptempo song, keep the low end on the kick a bit leaner. But if you’re working with a slow ballad with lots of space between the hits, you can usually add a lot more low end without things sounding muddy.
Tip #9: Top End Is Key
When it comes to EQing the kick, most people focus on the low end exclusively. The spend lots of time dialing in the sub to get that punch in the low end. And while that’s important, it’s not everything. In fact, the most important part of the kick isn’t the low end, but the top end.
The top end of the kick is where the “beater” or “click” of the kick resides. You’ll usually find it around 5 kHz, but the spot can vary depending on the specific kick you’re working with.
The top end is an essential part of the kick sound, as it helps the drum cut through your mix. And often times, if your ear hears the top end on the kick, it will feel like there’s a lot of low end there, even when there isn’t.

Listen to a few of your favorite records and notice how bright the kicks sound. They’re probably brighter than you think.
When you’re having trouble getting the kick to cut through your mix, start by adding top end instead of low end. Bring out that “clicky” sound with a healthy boost around 5 kHz, and you can add clarity and presence while keeping the low end lean and clean.
Tip #10: Don’t Be Afraid To High Pass
It seems crazy to cut the low end out of a kick. But sometimes, it’s essential.
Often times, the lowest lows on a kick get in the way. There can be lots of rumble around 20 – 50 Hz that muddies up your track and doesn’t contribute anything useful.
Adding a high-pass filter can clean this up and actually make the kick punchier.

I wouldn’t do this by default, but if you’re hearing that your kick sounds muddy or boomy, try adding a high-pass filter and see if you can clear things up. Be sure to play around with the slope settings — sometimes steeper slopes can give the kick more punch.
Unless you’re working in a studio with a superb monitoring chain, I recommend doing this on headphones. This way, you’ll be able to hear more accurately what the high-pass filter is doing, without being misled by room acoustics.
Tip #11: Combine A Boost And Cut
When you add low end on a kick, sometimes the kick starts to sound muddy. This is because if you add a boost in the sub, that boost often extends higher up into the lower midrange (200 – 500 Hz). This area is often the source of muddiness.

A trick you can try is to boost the low end, and then add a cut just above the boost to counteract the muddiness. This trick is similar to the effect achieved if you turn up both the boost and cut knobs on a Pultec-style EQ.
By combining a boost and cut in the low end, you can get more punch and weight without adding mud.
Tip #12: Add A Gate For Clarity
When you’re aggressively EQing a kick that was recorded as part of a live drum kit, you have to be careful. Often times, there’s lots of bleed in the kick drum track from the other drums. If you solo the kick, you can usually hear the snare, toms, and cymbals.
When you EQ your kick drum, you have to pay attention to this bleed. If you add lots of top end on the kick, sometimes the cymbals get brought out in a way that sounds harsh and aggressive.
The best solution for this is prevention. When recording the kick, cover the outer head and mic in a thick blanket. This will help minimize the bleed.
When you’re mixing, if you’re going to apply aggressive EQ to a kick with a lot of bleed, it’s usually a good idea to gate it first. A gate will cut out the parts of the track when the kick isn’t playing. This way, you can apply aggressive EQ without worrying about bringing out the bleed.

You can also try augmenting the kick with a drum sample, which will add clarity and presence and allow you to achieve the sound you’re looking for without as much EQ.
Tip #13: Get Your Room Right
It’s difficult to nail your kick drum EQ if you can’t hear what’s really going on in your mix. And because of poor room acoustics, this is often the case.

While you can use headphones to make EQing your kick easier, the best solution is to improve your room acoustics so you don’t have to worry about whether or not what you’re hearing is correct.
The best place to start is to find the right spots in your room for your speakers and listening position. Get this right, and you can achieve a more balanced, natural-sounding listening environment — which will improve your kick drum EQ decisions.
To learn how to do this, check out the video below:
Wrapping Things Up
You should now be able to EQ any kick drum with more confidence. But if you’re ready to dive deeper, don’t forget to grab my free EQ Cheatsheet too. It’s packed with more EQ tips and tricks that will add clarity and presence to your tracks.
Before you go, leave a comment below and let me know — what’s your go-to plugin for kick drum EQ?
Happy mixing!